Upgrading your home with new window blinds can dramatically improve both visual appeal and energy efficiency. Whether you’re refreshing a single room or undertaking a whole-home makeover, the right blinds make all the difference in comfort and style. Before you dive into measuring and drilling, understanding your options and the process is crucial. If you’re seeking professional help, a reliable blind installation service can deliver expert results for any project, regardless of size.
Careful selection and precise installation of blinds can increase privacy, control sunlight, and even reduce monthly energy bills. Navigating the options may feel overwhelming, but with a step-by-step approach, anyone can make the right choice and complete a secure installation. In addition to considering the visual match with your décor, it’s important to factor in material durability and daily use requirements, so your investment stands the test of time.
Before you get started, it helps to learn not just about different types of blinds, but also about proper measurements and maintenance. This ensures an effortless fit, smooth operation, and lasting performance. Adopting a proactive approach to care will help maintain their appearance years after installation, enhancing the comfort and value of your living space.
Many homeowners are surprised by how a detail as simple as window coverings can elevate an entire room. You don’t need to be a renovation expert to install modern blinds, especially since most models are designed for DIY installation. These easy-to-follow steps will help guide your project from start to finish, ensuring the result is as practical as it is attractive.
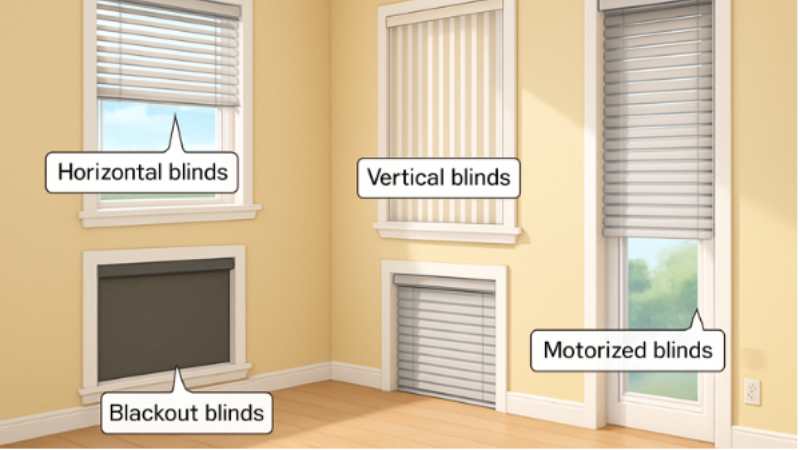
Types of Window Blinds
Choosing blinds begins with understanding your household’s unique needs and home layout. Below are some of the most popular and versatile options:
- Horizontal Blinds: These classic blinds feature adjustable slats and suit a wide variety of window shapes and sizes. They are perfect for bedrooms, kitchens, and offices, providing customizable light filtration and privacy.
- Vertical Blinds: With wide slats hanging vertically, this option is particularly well-suited to sliding doors or large windows. Vertical blinds offer easy access and strong light control, making them a popular pick for living rooms and patios.
- Energy-Efficient Blinds: Made of insulating materials, these blinds help regulate indoor temperatures and lower utility costs. They’re ideal for climate-conscious homeowners seeking better year-round comfort.
- Blackout Shades: Designed for total darkness, blackout blinds are the solution for media rooms and bedrooms, where blocking outside light is essential for sleep and entertainment.
- Motorized Blinds: For hard-to-reach windows or anyone seeking smart-home convenience, motorized blinds offer remote or smart-device control for effortless adjustments.
Measuring Your Windows
Getting the measurements right is critical for both aesthetics and performance. An ill-fitting blind can let in too much light or look unfinished. Follow this process for perfect results:
- Decide on Mounting Style: An inside mount places the blind within the window frame for a sleek, recessed look, while an outside mount fixes it to the wall above, which can make windows appear larger and offer more light coverage.
- Measure Width and Height: For inside mounting, measure the width at the top, middle, and bottom—using the smallest measurement for a snug fit. For outside mounting, add at least an inch or two beyond each edge to ensure full coverage. Always use a steel measuring tape for precision and double-check your numbers.
Tools and Materials Needed
Before beginning your installation, assemble all necessary tools and parts. Preparation ensures an efficient, stress-free process and helps prevent common mistakes:
- Measuring tape (preferably steel)
- Pencil for marking measurements
- Carpenter’s level to ensure straight placement
- Power drill and suitable drill bits
- Screwdriver (manual or powered)
- Blind mounting brackets (typically supplied with the blinds)
- Screws and anchors (for wall-mounting)
- The blinds themselves
Step-by-Step Installation Guide
- Mark Bracket Placement: Hold the bracket in the correct position at the top corners of your window frame (inside mount) or above the window on the wall (outside mount). Mark pilot holes using a pencil.
- Install Brackets: Use a drill to create pilot holes, then attach your brackets with screws. A level will confirm they’re straight and even.
- Attach the Headrail: Snap or slide the headrail of your blinds into the mounted brackets, following the manufacturer’s instructions. Ensure it’s securely fastened and centered.
- Install Wand or Cord: Attach the opening mechanism—whether it’s a wand or a cord per the instructions provided with your blinds.
- Test Your Blinds: Gently raise, lower, and tilt the blinds several times to make sure everything operates smoothly and securely. Adjust if necessary.
Maintenance Tips
- Regular Dusting: Keep blinds dust-free by wiping them weekly with a soft cloth or using a microfiber duster. This simple routine prevents buildup and keeps your blinds looking fresh.
- Deep Cleaning: For a thorough clean, use a damp cloth and mild soap for most materials. Be sure to follow any specific cleaning instructions provided by the manufacturer, especially with fabric or wood blinds.
- Check Components: Periodically inspect cords, wands, and hardware for wear or damage. Address minor issues immediately to avoid more extensive repairs later.
- Repair Promptly: If you notice a broken slat or malfunctioning mechanism, remedy it as soon as possible to maintain both appearance and function.
Sticking to a consistent care routine will not only preserve your investment but also ensure your blinds add lasting comfort and value to your home.
Final Thoughts
Installing window blinds is a practical upgrade that combines style, comfort, and efficiency in one simple project. With the right knowledge, careful measurements, and a methodical approach, homeowners can confidently choose and install blinds that enhance both the look and functionality of their spaces. From improved light control and privacy to better energy efficiency, well-installed blinds deliver long-term benefits that extend beyond aesthetics. Whether you opt for a DIY approach or enlist professional installation support, investing time in proper selection, installation, and maintenance ensures your window blinds remain a valuable and attractive feature of your home for years to come.